|
This exercise will show you how you can easily unfold an object (e.g,. to make a template) with Amapi 3D. You will use the “working plane” facility to punch a true circular hole on a sloping plane.
|
|
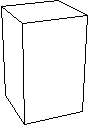
Draw the box
· Step 1: The cube
q Tool: 2D Drawing tool, Polylines
q Open the model file: Enceinte01
q Do this:
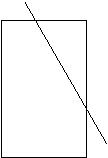
1. Side view (key 4).
2. Select the Polyline tool.
3. Use polar coordinates (PC: Click on the right mouse button, Mac: Hold the Option key pressed and click the mouse button).
4. Draw a line, with an angle of 60° from the vertical axis. This line will cut the upper face of the cube.
q See the detailed explanations in the chapter:
User Manual/Tools/Construction/Drawing/Polyline
|
|
q Tool: Cut (Punch)
q Open the model file: Enceinte02
q Do this:
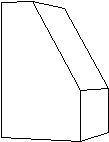
1. Side view (key 4).
2. The cube is the current object.
3. Select the Cut (Punch) tool.
4. Click on the cutting line.
5. The cube is split.
6. Select and delete the volume with the triangular face.
7. Now, we get the baffle body.
q See the detailed explanations in the chapter:
User Manual/Tools/Model/Cut/Punch
|
|
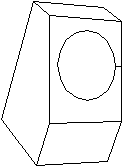
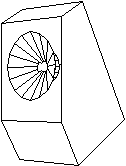
Punch the loudspeaker’s hole
· Step 1: Changing the working plane
q Tool: Control Panel, Working Plane
q Open the model file: Enceinte03
q Do this:
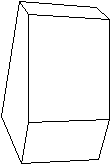
Now, we will change the working plane to drill perpendicular to the face (to avoid drilling an oval hole).
1. Select the Working Plane tool in the Control Panel.
2. Click on the sloping plane: Amapi 3D rotates the baffle so that this plane matches the nearest orthogonal plane.
q See the detailed explanations in the chapter:
User Manual/ Modeling help tools/Control Panel/Working Plane
|
|
q Tool: Drawing tool, Circle
q Open the model file: Enceinte04
q Do this:
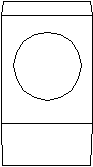
1. Face view (key 2).
2. Select the Circle tool.
3. Draw a circle with 16 points, centered on the front face.
q See the detailed explanations in the chapter:
User Manual/Tools/Construction/Drawing/Circle
|
|
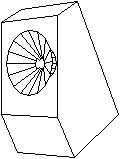
q Tool: Control Panel, Working Plane
q Open the model file: Enceinte08
q Do this:
Now, we will change the Working Plane to come back to the original working plan.
Select the Working Plane tool in the Control Panel.
The baffle is tilted and lies on its base
q See the detailed explanations in the chapter:
User Manual/ Modeling help tools/Control Panel/Working Plane
|
|
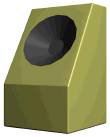
q Tool: Chamfer
q Open the model file: Enceinte09
q Do this:
We can refine our baffle by rounding the angles:
1. The baffle is the current object.
2. Select the Chamfer tool.
3. Set a small chamfer radius.
4. Validate.
The result is an acoustic baffle. If you apply a nice rendering texture, it might look nice in your living room...
q See the detailed explanations in the chapter:
User Manual/Tools/Modeling/Chamfer
|
|
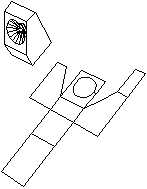
q Tool: Unfold
q Open the model file: Enceinte09
q Do this:
We could need to have a planar version of our baffle in order to build it. NOTE: Do not unfold a chamfered object.
We will unfold the chamfered version of the baffle box.
1. The baffle is the current object.
2. Select the Unfold tool.
3. Choose a facet to start the unfolding: for example, the smallest vertical face.
4. Unfold.
The result is a template. Now, you can measure the faces, or print to scale, or...
q See the detailed explanations in the chapter:
User Manual/Tools/Assembly/Unfold
|
|